- The Project: Custom DIY Bed-Height Dog Ramp.
- Cost: Under $10 (using scraps of wood and $2 mats).
- Best For: Small dogs (like Lucy, 6 lbs) or senior dogs with back issues/IVDD.
- Key Benefit: Prevents dangerous jumps from tall beds that standard stairs don’t reach.
My 4-year-old Dachshund Lucy had to have back surgery recently.

It was due to a combination of things:
- First, the neighbor’s dog attacked her.
- Next, she fell off the porch in the process of trying to get away.
- Then, she jumped off another tall porch.
Unfortunately, little legs and big jumps don’t mix.
I knew the day would come with back issues. It just happens with Dachshunds. But I did not expect it this soon — at only 4 years of age.
Fortunately, she recovered quickly.
Ever since Lucy’s back surgery, steps are not as easy for her to maneuver like they once were. (Plus, she shouldn’t be jumping off the bed like she did in the past anyway.)


A dog ramp (in lieu of doggie steps) seemed to make the most sense. That way, she could go up and down with no trauma to her little body.
Most of the dog ramps I found online were very expensive. And the height didn’t match up with my bed height.
So, I took some 1×12 pieces of pine wood that I had leftover from another project — and I built my own dog ramp!
Here’s how I did it…
How To Build A Dog Ramp Yourself
Step #1:
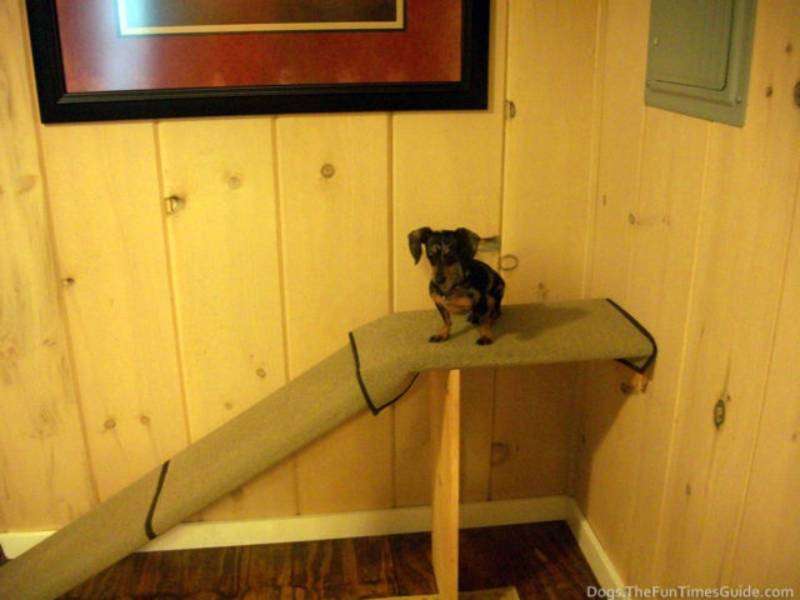
The first piece I cut was for a 2-foot landing that would give her plenty of room to get on and off the bed without worrying about her slipping.

Step #2:
I measured the height of the bed and cut a piece to put under the edge of the landing down to the floor as support.
Step #3:
I also cut a piece of wood to act as a nailer on the wall for the landing. Lucy only weighs 6 pounds, but I still wanted to make sure it was sturdy.

Step #4:
Then I cut another piece of wood that would attach to the landing and go down at a gentle slope to the end of the bed but not stick out past the foot board and be visible into the bedroom.
Step #5:
Next, I took a couple of “L” brackets and bent them slightly so I would have the downward slope I wanted on the ramp. I screwed those in place and tested it to make sure it all fit.

Step #6:
Then, I covered all the wood with some inexpensive door mats I got from Old Time Pottery. All I had to do was wrap the rugs around the edges of the wood and staple it underneath.

Step #7:
I left the carpet for the landing partially unstapled — so I could screw the wood into the nailer I had attached to the wall.
Step #8:
Once I securely attached the landing to the wall and had the support board underneath screwed in, I finished stapling the carpet around the wood so the screws were not exposed.

Summary
After putting my bed back in place, I got a few of Lucy’s favorite treats and we practiced going up and down her new dog ramp.
It works perfectly and she rarely JUMPS off the side of the bed anymore!
She was also great at modeling the ramp for me when the bed was not there. (I might have to get her an agent!)


“Tony’s Takeaway”: Lucy’s 6lb frame made it easy for me to think a light support ramp would work. But it’s best to always over-engineer for safety! It only takes one slip to cause a setback for such a small dog.
This was yet another inexpensive DIY dog project to complete!
I already had the pine wood scraps and the “L” brackets. The rugs were only $2 apiece. So this fancy dog ramp cost less than $10 to build!
At this point, my little house is pretty dog friendly. But I’m sure that I will come up with another DIY project soon…
Small Dog Tips To Prevent Back Injuries
1. Practice Using the “Treat Drill”
- Use high-value treats to guide your dog up and down the ramp at first. (This is especially helpful for very young pups and dogs recovering from surgery like Lucy — because it slowly builds “muscle memory”.).
2. Perform a “No-Jump” Home Audit
- Measure bed/furniture heights to make sure that all dog ramps and dog steps match the exact height of the furniture to prevent “mini-jumps”.
- Block off any couches and beds you don’t want your dog to use as a jumping-off spot with permanent barriers.
3. Use High-Traction Surfaces Inside Your Home
- Use high-grip materials (like door mats) rather than plain, uncovered pieces of wood — which are likely to be too slippery.